Yes – 2011 Is the current GSUSA badge
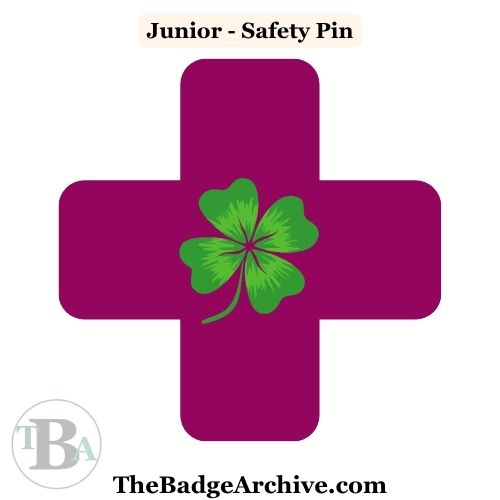
Released in 2011 and is considered part of the 2011 Girl’s Guide. The Junior page has information on when all badges were released.
What is this badge about?
Do an emergency evacuation drill, take a Hazard Walk, learn bike safety, how to prevent common injuries, AND read weather signs.
Choose your own activities!
Activity List(Not Available Yet)
Our Summary* of requirements:
- Make a list of common injuries for kids in 4th-5th grade AND do a home safety audit check.
- Do an emergency evacuation drill (home OR meeting place) AND know how to get out if the first exit is blocked.
- Learn weather signs to know when to get indoors or find a safe place.
- Learn bicycle safety including why helmets are important and how to fit a helmet properly.
- Take a hazard-identification walk (hiking, bike, OR horse trail).
* – This summary is based off the GSUSA requirements.
–
What is a good Troop Meeting Plan besides the VTK?
- Slideshow on Google Docs from GSCI – Archived Copy of PPT
Click to Expand → All Known Meeting Plans and Resource Links
Meeting Plans
- Directions from GSofME – Archived Copy of PDF
- Slideshow on Google Docs from GSCI – Archived Copy of PPT
Other Resources
- Basic Info from Scouts Honor Wiki
- Info webpage at Girl Scout Wiki
- Meeting Ideas from Big Crazy Life
- Basic Info from Scouts Honor Wiki
What is a good way to earn the badge at home?
- Virtual Program from GSIOWA
–
GSUSA Information and Details
Five steps are needed to complete this badge:
- Find out what the most common injuries are for kids your age. Make a list of how to prevent them.
Then do a home safety audit to check for dangers around the house. - Conduct an emergency evacuation drill of your home or the place your Girl Scout group meets.
In the case of fire, know where your main exit is located, and plan an alternative way to get out if the first exit is blocked. - Find out how to read weather signs so you know when to head indoors and get to safety.
- Learn about bicycle safety. Research why biking helmets are important and how to check if a helmet fits you properly.
- Go on a hazard-identification walk along a local hiking trail, bike trail, or horse trail.

Click to Expand → GSUSA Official Resources
- Requirements originally listed in Junior Girl Scout Handbook available in GSUSA.com
–
- No VTK Plan available as of Nov 2025
–
Is there a matching badge for Multi-Level Troops?
Learn about the Healthy Living Themed Multi-level GSUSA 2011 badges.
Where does this go on the Uniform?
This is a Safety Award pin and goes under the bridging badge – Click Here to see diagrams and details on where to place it or sash placement.
–
For More Fun Ideas and Plans

Join the Girl Scout Daisy, Brownie, and Junior Leader Help Facebook Group
(Not an official GSUSA Group)

Join the Girl Scout Cadette, Senior, and Ambassador Leader Help Facebook Group
(Not an official GSUSA Group)

See other Recommended Facebook Groups for some Scouting Organizations
(No official Groups)
–
Find out how you can support The Badge Archive!
–
- Return to the Junior Badge List.
–